After porting an eVC4 project into Visual Studio 8, I found that the application would run ok on a Windows Mobile 5.0 PDA, but would not run on a Pocket PC 2003 PDA.
For Windows Mobile projects in this newer development environment, there is no need to target the x86 build anymore. Use the /MACHINE:ARM option to set the target platform and the application will run in the Pocket PC Emulator.
The dumpbin.exe is a utility included in the C:\Program Files\Microsoft Visual Studio 9.0\VC\bin folder. First run vcvarsall.bat to set environment variables.
Use "dumpbin /headers Your.exe" to display the version that your executable is targeted to. The problem I encountered was that my Windows Mobile project was building a 5.01 version which will not run on the older PDA's.
Unfortunately there is no obvious way to change this version. Disable the Linker /SubSystem option and instead in Linker Command Line add the option /subsystem:windowsce,4.20. The executable is now targeting version 4.20!
Wednesday, June 11, 2008
Copy Files to the Device Emulator
On the Emulator that came with eVC4, it was quite clear how to link to a folder on your hard drive. The first menu was "Folder Sharing". Any folder set there will appear as the Storage Card in the Emulator. Another way was to use the Windows CE Remote File Viewer.
With the new Emulator, there's no menu item for "Folder Sharing", and there's no Remote File Viewer. That's because the new Emulator acts much more like a real device. Read my previous post on Configuring Active Sync to set up communications between your desktop computer and the Emulator.
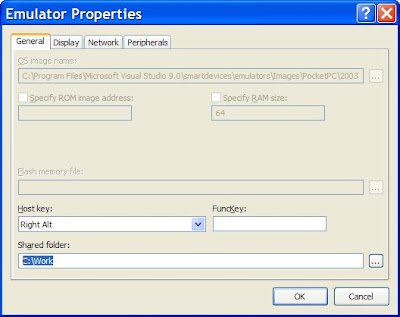
There is still a way to configure the Device Emulator to allow a folder on your harddrive to appear as a Storage Card. On the Emulators menu, go to File Configure and on the General tab at the bottom there's a place to enter the Shared Folder name. Browse to the folder you want to view from the Emulator, and press OK.
With the new Emulator, there's no menu item for "Folder Sharing", and there's no Remote File Viewer. That's because the new Emulator acts much more like a real device. Read my previous post on Configuring Active Sync to set up communications between your desktop computer and the Emulator.
There is still a way to configure the Device Emulator to allow a folder on your harddrive to appear as a Storage Card. On the Emulators menu, go to File Configure and on the General tab at the bottom there's a place to enter the Shared Folder name. Browse to the folder you want to view from the Emulator, and press OK.

Now when you browse using File Explorer on the Emulator, go to Storage Card. You have access to the files in your hard-drive folder!
Even better, when you Save State and Exit the Emulator, the next time you start the Emulator, the Storage Card still shows the folder on your hard drive! Also, any installed software and settings are saved too!
Data Abort Exceptions
Data Abort Exceptions were not being handled in my native C++ Windows Mobile project (running in debug mode) recently ported from eVC4. Some error information appeared in the output window, but the application would not break at the error, it just exited.
This made it rather hard to debug. It didn't behave like this in eVC4!
After some investigations, I found an easy fix: On the Debug Exceptions menu, in the Win32 Exceptions category, turn on the option to Break when Access Violations are thrown.
Data Abort: Thread=8db6e4a8 Proc=8c247550 'MyProgram.exe'
AKY=00004001 PC=0165d6d8 RA=0165d6cc BVA=1e69006a FSR=00000407
This made it rather hard to debug. It didn't behave like this in eVC4!
After some investigations, I found an easy fix: On the Debug Exceptions menu, in the Win32 Exceptions category, turn on the option to Break when Access Violations are thrown.

Now when running in the debugger, Visual Studio happily gives the option to Break, Continue, or Ignore!
Error code 0x8007007e
Context: Visual Studio 2008, with a Pocket PC 2003 project ported from eVC4. When attempting to run from the IDE, this error message appears:
Unable to start program 'MyProgram.exe'.
An error occurred that usually indicates a corrupt installation (code 0x8007007e). If the problem persists, repair your Visual Studio installation via 'Add or Remove Programs' in Control Panel.
Reason for Error: Project is dynamically linked to MFC, but the neccessary dll files are not deployed to the Emulator.
Solution: Create a new project for Windows Mobile 5.0 in Visual Studio 2008. Look at the setting: "Additional Files" which is in "Configuration Properties Deployment". Copy the value from the new default project into the old project that doesn't work.
Here's the settings for release mode:
msvcr90.dll$(BINDIR)\$(INSTRUCTIONSET)\%CSIDL_PROGRAM_FILES%\$(ProjectName)0;atl90.dll$(BINDIR)\$(INSTRUCTIONSET)\%CSIDL_PROGRAM_FILES%\$(ProjectName)0;MFC90U.dll$(BINDIR)\$(INSTRUCTIONSET)\%CSIDL_PROGRAM_FILES%\$(ProjectName)0;
And the settings for debug mode:
msvcr90.dll$(BINDIR)\$(INSTRUCTIONSET)\%CSIDL_PROGRAM_FILES%\$(ProjectName)0;atl90.dll$(BINDIR)\$(INSTRUCTIONSET)\%CSIDL_PROGRAM_FILES%\$(ProjectName)0;msvcr90d.dll$(BINDIR)\$(INSTRUCTIONSET)\%CSIDL_PROGRAM_FILES%\$(ProjectName)0;MFC90UD.dll$(BINDIR)\$(INSTRUCTIONSET)\%CSIDL_PROGRAM_FILES%\$(ProjectName)0;
Configure Active Sync with the Device Emulator
On the Emulator that came with eVC4, it was quite clear how to link to a folder on your hard drive. The first menu was "Folder Sharing". Any folder set there will appear as the Storage Card in the Emulator. Another way was to use the Windows CE Remote File Viewer.
With the new Emulator, there's no menu items for "Folder Sharing", and there's no Remote File Viewer. That's because the new Emulator acts much more like a real device. You need to configure Active Sync to share files between your desktop computer and the Emulator.
Open Active Sync. Choose File Connection Settings to open the dialog as shown below. Turn on the option to "Allow connections to one of the following" and select "DMA" from the droplist.

From the Visual Studio 2008 Tools menu, choose Device Emulator Manager. Right-click on the Emulator you are using, and choose "Cradle" from the context menu. This will connect the Emulator through Active Sync to your desktop computer.

So now if you open File Explorer on your desktop, the Emulator appears as Mobile Device just as if it were a real PDA connected via Active Sync! Copy files from your hard drive to the Mobile Device using copy/paste context menus in File Explorer.
Next question, can we save those files that were copied across so the next time the Emulator starts, the files will be there?
Subscribe to:
Comments (Atom)