Redirect Non-WWW to WWW URLs
To a search engine web addresses like http://mlntips.com/ and http://www.mlntips.com/ are different websites. The problem is your link popularity will get diluted between the two versions.
Check if this is the case by looking at the Page Rank with & without the WWW in the URL. If the Page Ranks are different, you'll want to fix this problem.
The solution is to use a 301 Redirect from the "non-WWW" version. Doing this will consolidate your link popularity to a single URL.
Moving Pages with 301 Redirects
Another reason for setup up permenant redirect is when you move the location of a webpage, change it's name or move it to a different domain name.
Using a meta refresh is the wrong solution for this problem because it is used by spammers to trick search engines. On the other hand, a 301 redirect tells the search engine to update their records and replace the old URL with the new one.
Sources of info & Instructions how to set up 301 Redirect:
Tuesday, February 23, 2010

Keyword Analysis
Researching Keywords
Before you start writing content, develop a list of keywords for your subject. Then use this list to ensure your content will get indexed to your topic. Here's a few ways to get ideas:
1. If you already have traffic, getting the actual keywords your readers used is easy enough with Tracking Software. Any search terms used to find your site will be listed in the logs.
2. Browse through sites like Delicious and Magnolia to see how people are tagging sites similar to yours (or your site if you have the traffic).
3. Google AdWords keyword tool (https://adwords.google.com/select/KeywordToolExternal) is useful to see both keyword volume and advertiser competition. Google recently changed the search volume from little green bars to approximate number figures, so now it's much easier to figure out volume differences. This tools can give good indications about how much revenue may be generated from those keywords.
Before you start writing content, develop a list of keywords for your subject. Then use this list to ensure your content will get indexed to your topic. Here's a few ways to get ideas:
1. If you already have traffic, getting the actual keywords your readers used is easy enough with Tracking Software. Any search terms used to find your site will be listed in the logs.
2. Browse through sites like Delicious and Magnolia to see how people are tagging sites similar to yours (or your site if you have the traffic).
3. Google AdWords keyword tool (https://adwords.google.com/select/KeywordToolExternal) is useful to see both keyword volume and advertiser competition. Google recently changed the search volume from little green bars to approximate number figures, so now it's much easier to figure out volume differences. This tools can give good indications about how much revenue may be generated from those keywords.
Put Keywords in your Content
Make sure you embed these keywords into strategic areas as you write the content. At the same time, don't forget to write the content for your readers first, and the search engines second!
- title tags
- h1, h2, h3 tags
- strong & em tags
- link labels
- file names
- alt tags
- first line of first paragraph
Keyword Density
The Ranks NL Webmaster Tools has a very cool keyword density analyser. Use this to get feedback on how well your keyword targets are being met. If this tool reports that you're a little light, go back and add more keywords into your content.
Friday, March 20, 2009
Finding a Stack Overflow
Today I had a little difficulty tracking down a Stack Overflow problem when debugging a Windows Mobile 5.0 project using the emulator. The Call Stack Window was blank, kinda difficult to find where in the code the problem occured.
Thankfully there's an easy solution! Open the Exceptions Window (shown below) and toggle on the appropriate exception types, in this case its Stack Overflow. Now the IDE stops at the source of the problem, with a full Call Stack Window, nice!

Thankfully there's an easy solution! Open the Exceptions Window (shown below) and toggle on the appropriate exception types, in this case its Stack Overflow. Now the IDE stops at the source of the problem, with a full Call Stack Window, nice!

If you're still having problems breaking in the code when the Stack Overflow occurs, check on the Linker System settings page for the Stack Reserve Size and Stack Commit Size. Try setting both the Stack Reserve Size and Stack Commit Size to zero.
The combination of turning on the Stack Overflow Exception Type, and setting Stack Reserve Size to zero seemed to allow the debugger to stop with a full Call Stack Window, giving me more information about the source of the problem.
Friday, February 27, 2009
Debugger won't break in managed dll when running from unmanaged project
In the previously described scenario, where a native MFC C++ application calls a .NET assembly via a bridge dll, I ran into some debugging issues.
- The debugger doesn't stop at break points set in the bridge dll or the .NET assembly code.
- The debugger doesn't step into the bridge dll source code.
This problem is solved by setting Configuration Properties | Debugger Type to Mixed mode for each project.
Note: this is a different than setting "Mixed Platforms", which appears when you have a C++ project and a C# project in the same solution.
Thursday, February 26, 2009
Call Managed DLL From Unmanaged EXE
Here's a quick run-through showing how to call a .NET assembly from a native MFC C++ application.
Why would anyone want to do that? Useful for extending a large existing MFC codebase to use new CLR features without modifying the build settings of the original MFC projects.
Unmanaged Native C++ application calls through a bridge dll to the managed .NET Assembly:
MFC exe --> MFC Extension DLL --> .NET Assembly
The MFC executable doesn't need to have /clr turned on because the MFC Extension DLL acts as a cover over the .NET code. The .NET Assembly can be written in your favorite .NET language, like C#.
1. This example assumes you're starting with an existing MFC application solution. Set up the .NET Assembly by adding a new CLR Class Library project to your solution.
- Add a new CLR Class Library, called BackEnd.dll for this example.
- Add a new class to the dll, use the standard export declarations.
namespace BackEnd {

    public ref class Class1
    {
    public:
       int BCount(int a, int b)
       {
          return a + b;
       }
    };
}
2. Add the bridge dll to sit between the managed dll and your unmanaged application:
- Add a new MFC Extension DLL, called Bridge.dll for this example.
- Don't forget to add Linker Additional Dependancies : "..\bin\Bridge.lib" to your executables project settings.
- Turn on CLR support, set the /clr flag in the bridge dll project settings.
- Add a new class to the dll, use the standard export declarations.
Check.h
class __declspec(dllexport) Check
{
public:
    Check(void);
    virtual ~Check(void);

    int Count(int a, int b);
};
Check.cpp
#include "StdAfx.h"
#include "Check.h"

#using "..\Debug\BackEnd.dll"

using namespace System;
using namespace BackEnd;

Check::Check(void)
{
}

Check::~Check(void)
{
}

int Check::Count(int a, int b)
{
    // Note this is dll uses C++/CLI style coding
    Class1^ test = gcnew Class1();
    return test->BCount(a, b);
}
Also, be sure to set the debugger to mixed mode to allow breaking in managed code when running from the native executable.
Tuesday, September 30, 2008
MFC Upgrade
I just watched an awesome video describing the new features they've added to MFC.
The timing of this upgrade is very good, it's exactly what my company is looking for to bring the look-and-feel of our software "out of the 90's" (to quote Pat Brenner).
Pat Brenner: New Updates to MFC in Visual Studio 2008
Key features that I need to investigate further:
The timing of this upgrade is very good, it's exactly what my company is looking for to bring the look-and-feel of our software "out of the 90's" (to quote Pat Brenner).
Pat Brenner: New Updates to MFC in Visual Studio 2008
Key features that I need to investigate further:
- Smart Docking (like in Visual Studio)
- Ribbon bar
- Tabbed MDI (tabs can be colored)
- Status bar update
For more details, check out Pat Brenner's Quick Tour Of New MFC Functionality.
Monday, September 29, 2008
How to Videos for Visual C++
Here's a collection of links to sites with lots of "How to" code in Visual Studio videos:
"How Do I?" Videos for Native Coding have lots of content for MFC and Visual C++, here's a list of my favorites (or at least the ones I would like to watch!):
"How Do I?" Videos for Native Coding have lots of content for MFC and Visual C++, here's a list of my favorites (or at least the ones I would like to watch!):
- How Do I: Implement Undo and Redo in MFC?
- How Do I: Use the Visual C++ 2008 Feature Pack?
- How Do I: Implement CScrollView in an Application?
- How Do I: Create Context-Sensitive Menus in MFC?
- How Do I: Create my Own Custom Exception Classes?
- How Do I: Use the CtrlView Classes in MFC?
- How Do I: Eliminate "Flicker" when Drawing in a Window?
- How Do I: Learn Techniques to Decrease Buffer Overruns in Visual C++?
- How Do I: Use Active Template Library Support in Visual C++?
- How Do I: Use MFC Control Classes to Customize Control Behavior?
- How Do I: Improve My Debugging Productivity with Visual C++ Visualizers?
- How Do I: Create and Analyze a Mini-Dump File in Windows?
Wednesday, June 11, 2008
Target Older Platform After Porting
After porting an eVC4 project into Visual Studio 8, I found that the application would run ok on a Windows Mobile 5.0 PDA, but would not run on a Pocket PC 2003 PDA.
For Windows Mobile projects in this newer development environment, there is no need to target the x86 build anymore. Use the /MACHINE:ARM option to set the target platform and the application will run in the Pocket PC Emulator.
The dumpbin.exe is a utility included in the C:\Program Files\Microsoft Visual Studio 9.0\VC\bin folder. First run vcvarsall.bat to set environment variables.
Use "dumpbin /headers Your.exe" to display the version that your executable is targeted to. The problem I encountered was that my Windows Mobile project was building a 5.01 version which will not run on the older PDA's.
Unfortunately there is no obvious way to change this version. Disable the Linker /SubSystem option and instead in Linker Command Line add the option /subsystem:windowsce,4.20. The executable is now targeting version 4.20!
For Windows Mobile projects in this newer development environment, there is no need to target the x86 build anymore. Use the /MACHINE:ARM option to set the target platform and the application will run in the Pocket PC Emulator.
The dumpbin.exe is a utility included in the C:\Program Files\Microsoft Visual Studio 9.0\VC\bin folder. First run vcvarsall.bat to set environment variables.
Use "dumpbin /headers Your.exe" to display the version that your executable is targeted to. The problem I encountered was that my Windows Mobile project was building a 5.01 version which will not run on the older PDA's.
Unfortunately there is no obvious way to change this version. Disable the Linker /SubSystem option and instead in Linker Command Line add the option /subsystem:windowsce,4.20. The executable is now targeting version 4.20!
Copy Files to the Device Emulator
On the Emulator that came with eVC4, it was quite clear how to link to a folder on your hard drive. The first menu was "Folder Sharing". Any folder set there will appear as the Storage Card in the Emulator. Another way was to use the Windows CE Remote File Viewer.
With the new Emulator, there's no menu item for "Folder Sharing", and there's no Remote File Viewer. That's because the new Emulator acts much more like a real device. Read my previous post on Configuring Active Sync to set up communications between your desktop computer and the Emulator.
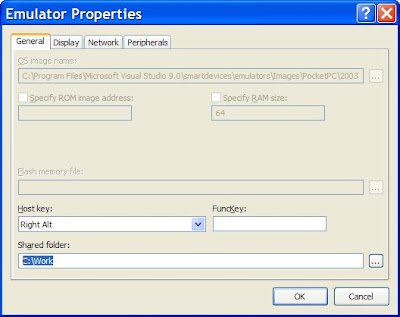
There is still a way to configure the Device Emulator to allow a folder on your harddrive to appear as a Storage Card. On the Emulators menu, go to File Configure and on the General tab at the bottom there's a place to enter the Shared Folder name. Browse to the folder you want to view from the Emulator, and press OK.
With the new Emulator, there's no menu item for "Folder Sharing", and there's no Remote File Viewer. That's because the new Emulator acts much more like a real device. Read my previous post on Configuring Active Sync to set up communications between your desktop computer and the Emulator.
There is still a way to configure the Device Emulator to allow a folder on your harddrive to appear as a Storage Card. On the Emulators menu, go to File Configure and on the General tab at the bottom there's a place to enter the Shared Folder name. Browse to the folder you want to view from the Emulator, and press OK.

Now when you browse using File Explorer on the Emulator, go to Storage Card. You have access to the files in your hard-drive folder!
Even better, when you Save State and Exit the Emulator, the next time you start the Emulator, the Storage Card still shows the folder on your hard drive! Also, any installed software and settings are saved too!
Data Abort Exceptions
Data Abort Exceptions were not being handled in my native C++ Windows Mobile project (running in debug mode) recently ported from eVC4. Some error information appeared in the output window, but the application would not break at the error, it just exited.
This made it rather hard to debug. It didn't behave like this in eVC4!
After some investigations, I found an easy fix: On the Debug Exceptions menu, in the Win32 Exceptions category, turn on the option to Break when Access Violations are thrown.
Data Abort: Thread=8db6e4a8 Proc=8c247550 'MyProgram.exe'
AKY=00004001 PC=0165d6d8 RA=0165d6cc BVA=1e69006a FSR=00000407
This made it rather hard to debug. It didn't behave like this in eVC4!
After some investigations, I found an easy fix: On the Debug Exceptions menu, in the Win32 Exceptions category, turn on the option to Break when Access Violations are thrown.

Now when running in the debugger, Visual Studio happily gives the option to Break, Continue, or Ignore!
Error code 0x8007007e
Context: Visual Studio 2008, with a Pocket PC 2003 project ported from eVC4. When attempting to run from the IDE, this error message appears:
Unable to start program 'MyProgram.exe'.
An error occurred that usually indicates a corrupt installation (code 0x8007007e). If the problem persists, repair your Visual Studio installation via 'Add or Remove Programs' in Control Panel.
Reason for Error: Project is dynamically linked to MFC, but the neccessary dll files are not deployed to the Emulator.
Solution: Create a new project for Windows Mobile 5.0 in Visual Studio 2008. Look at the setting: "Additional Files" which is in "Configuration Properties Deployment". Copy the value from the new default project into the old project that doesn't work.
Here's the settings for release mode:
msvcr90.dll$(BINDIR)\$(INSTRUCTIONSET)\%CSIDL_PROGRAM_FILES%\$(ProjectName)0;atl90.dll$(BINDIR)\$(INSTRUCTIONSET)\%CSIDL_PROGRAM_FILES%\$(ProjectName)0;MFC90U.dll$(BINDIR)\$(INSTRUCTIONSET)\%CSIDL_PROGRAM_FILES%\$(ProjectName)0;
And the settings for debug mode:
msvcr90.dll$(BINDIR)\$(INSTRUCTIONSET)\%CSIDL_PROGRAM_FILES%\$(ProjectName)0;atl90.dll$(BINDIR)\$(INSTRUCTIONSET)\%CSIDL_PROGRAM_FILES%\$(ProjectName)0;msvcr90d.dll$(BINDIR)\$(INSTRUCTIONSET)\%CSIDL_PROGRAM_FILES%\$(ProjectName)0;MFC90UD.dll$(BINDIR)\$(INSTRUCTIONSET)\%CSIDL_PROGRAM_FILES%\$(ProjectName)0;
Unable to start program 'MyProgram.exe'.
An error occurred that usually indicates a corrupt installation (code 0x8007007e). If the problem persists, repair your Visual Studio installation via 'Add or Remove Programs' in Control Panel.
Reason for Error: Project is dynamically linked to MFC, but the neccessary dll files are not deployed to the Emulator.
Solution: Create a new project for Windows Mobile 5.0 in Visual Studio 2008. Look at the setting: "Additional Files" which is in "Configuration Properties Deployment". Copy the value from the new default project into the old project that doesn't work.
Here's the settings for release mode:
msvcr90.dll$(BINDIR)\$(INSTRUCTIONSET)\%CSIDL_PROGRAM_FILES%\$(ProjectName)0;atl90.dll$(BINDIR)\$(INSTRUCTIONSET)\%CSIDL_PROGRAM_FILES%\$(ProjectName)0;MFC90U.dll$(BINDIR)\$(INSTRUCTIONSET)\%CSIDL_PROGRAM_FILES%\$(ProjectName)0;
And the settings for debug mode:
msvcr90.dll$(BINDIR)\$(INSTRUCTIONSET)\%CSIDL_PROGRAM_FILES%\$(ProjectName)0;atl90.dll$(BINDIR)\$(INSTRUCTIONSET)\%CSIDL_PROGRAM_FILES%\$(ProjectName)0;msvcr90d.dll$(BINDIR)\$(INSTRUCTIONSET)\%CSIDL_PROGRAM_FILES%\$(ProjectName)0;MFC90UD.dll$(BINDIR)\$(INSTRUCTIONSET)\%CSIDL_PROGRAM_FILES%\$(ProjectName)0;
Configure Active Sync with the Device Emulator
On the Emulator that came with eVC4, it was quite clear how to link to a folder on your hard drive. The first menu was "Folder Sharing". Any folder set there will appear as the Storage Card in the Emulator. Another way was to use the Windows CE Remote File Viewer.
With the new Emulator, there's no menu items for "Folder Sharing", and there's no Remote File Viewer. That's because the new Emulator acts much more like a real device. You need to configure Active Sync to share files between your desktop computer and the Emulator.
Open Active Sync. Choose File Connection Settings to open the dialog as shown below. Turn on the option to "Allow connections to one of the following" and select "DMA" from the droplist.

From the Visual Studio 2008 Tools menu, choose Device Emulator Manager. Right-click on the Emulator you are using, and choose "Cradle" from the context menu. This will connect the Emulator through Active Sync to your desktop computer.

So now if you open File Explorer on your desktop, the Emulator appears as Mobile Device just as if it were a real PDA connected via Active Sync! Copy files from your hard drive to the Mobile Device using copy/paste context menus in File Explorer.
Next question, can we save those files that were copied across so the next time the Emulator starts, the files will be there?
With the new Emulator, there's no menu items for "Folder Sharing", and there's no Remote File Viewer. That's because the new Emulator acts much more like a real device. You need to configure Active Sync to share files between your desktop computer and the Emulator.
Open Active Sync. Choose File Connection Settings to open the dialog as shown below. Turn on the option to "Allow connections to one of the following" and select "DMA" from the droplist.

From the Visual Studio 2008 Tools menu, choose Device Emulator Manager. Right-click on the Emulator you are using, and choose "Cradle" from the context menu. This will connect the Emulator through Active Sync to your desktop computer.

So now if you open File Explorer on your desktop, the Emulator appears as Mobile Device just as if it were a real PDA connected via Active Sync! Copy files from your hard drive to the Mobile Device using copy/paste context menus in File Explorer.
Next question, can we save those files that were copied across so the next time the Emulator starts, the files will be there?
Subscribe to:
Posts (Atom)
